Texture Measurement with EMATs I
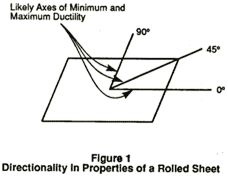
Directed ultrasonic velocity measurements predict formability by taking advantage of the effects of directional anisotropy that exists in the worked sheet (induced by the rolling process). One consequence of directionality is a change in mechanical properties with direction. For example, the yield strength and ductility may change with the orientation at which a laboratory tensile specimen is cut from a sheet. Generally, minimum and maximum values of these quantities occur at 0 degrees, in the vicinity of 45 degrees and at 90 degrees with respect to the rolling direction (see Figure 1). Any formation of ears in drawing operations (two fold and four fold) will also generally take place along these axes.
When forming sheet metal, practical consequences of directionality include such phenomena as excess wrinkling, puckering, ear-formation, local thinning, or actual rupture. At best, these can cause individual pieces to be scrapped. A more serious consequence is the down time required to correct the manufacturing process.
A number of specialized laboratory mechanical tests have been developed to identify the severity of directionality. Included are measurements of plastic strain ratios in tensile tests, limiting drawing ratio measurements, cupping tests, etc. Of particular interest here is the plastic strain ratio, defined as
Where ew is the strain ratio in the width direction and et is the strain in the thickness direction of a tensile coupon loaded in the plastic regime. The plastic strain ratio determines the relative tendency of deformation to occur in the plane of the sheet (ew) as opposed to through the thickness (et). In general, r will vary with the angle at which the tensile coupon is cut with respect to the rolling direction of the sheet.
Directions with large values of r will generally correspond to directions of ear formation when a cup is deep drawn, as sketched in Figure 2. The "RD" indicates the rolling direction, with respect to which the angles that are measured. The upper set of curves shows the variation of r with angle. The lower sketches represent the resulting cup contour.
Two commonly used figures of merit are the average plastic strain ratio or normal anisotropy, defined as
and the planar anisotropy, defined as
Formability of a drawing quality sheet depends largely on two factors: drawability (capability to be drawn from the flange area of the blank into the die cavity) and stretchability (capability to be stretched under biaxial tension to the contours of the punch). Drawability is related primarily to plastic anisotropy, and the average plastic strain ratio, r, is a common measure of its value. This is schematically illustrated in Figure 2. The planar anisotropy, Ar, is thought to be a measure of the tendency to form ears. As will be discussed shortly, directionality is sensed in ultrasonic velocity measurements by taking advantage of another one of its consequences, the dependence of elastic properties on direction. These are determined nondestructively from the elastic wave speeds.
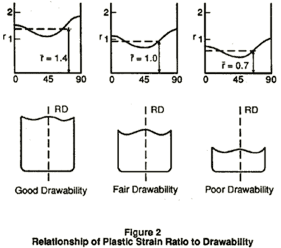
Figure 3 illustrates the causes for the existence of directionality (anisotropy) in the processed sheet. There are two kinds of anisotropy: one is caused by the alignment of the nonmetallic inclusions existing in the ingot (called mechanical fibering or fiber texture) and the other is due to the alignment of the grains or crystals, and is called preferred orientation or crystallographic texture. The effects of preferred orientation have more profound implications in deep drawing operations, and it is this property that is sensed by ultrasonic measurements.
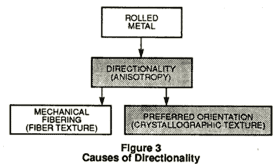
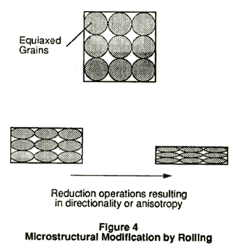
Figure 4 demonstrates how the preferred orientation is developed through the effects of the rolling operations on the grains of the unprocessed sheet. In response to the force imposed in working the metal, extensive plastic deformation must take place. At a microscopic level, this may be thought of as a result of dislocation motion along planes of low resistance. Two interrelated phenomena result: an elongation of the grains that could be observed visibly, and a change in the crystallographic orientation of the grains. The latter is believed to be the primary cause of directionality of properties associated with deep drawing. It can be sensed by X-ray diffraction or by ultrasonic wave speed measurements.
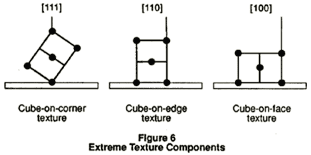
As an example of the effects of texture on the drawing capability of the sheets, one can qualitatively consider the impact of idealized textures in low carbon steel sheets. The bcc structure of the steel is strongest when measured along its cube diagonal or [111] direction, less strong along its edge diagonal [110] and weakest along its face diagonal [100], as defined in Figure 5. It is known that when the material assumes the cube-on-corner texture (in which the crystals line up with the strongest direction, [111]) normal to the sheet, the most favorable normal anisotropy is obtained. On the other hand, an unfavorable normal anisotropy is associated with the cube-on-face texture, Figure 6.
![Important crystallographic directions in BCC metals are the [001], [111], [100],[110], and [010] directions.](../Graphics/uf-fig5.gif)
Signal processing includes the estimation of normal anisotropy from ultrasonic determinations of the strengths of such texture components. It is obviously desirable to monitor texture as early as possible in the rolling process to better control the amount of annealing and cold work necessary for a proper drawability.
In practice, the crystallites in commercial metal sheets do not only exhibit these few ideal orientations. Instead, they have a continuum of orientations which is best described by the crystallite orientation distribution function (CODF), giving the probability that a grain will have a particular orientation. There will be peaks in the CODF near ideal orientations, but the maxima are not necessarily sharp.
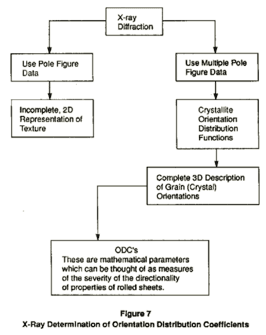
The conventional metallurgical technique for obtaining the grain orientations has been the measurement of pole figures using X-ray diffraction. A pole figure can only give an incomplete assessment of the orientations in a two dimensional form. However, computer programs have been developed to generate a complete description of the orientations (i.e. the CODF) based on the analysis of multiple pole figures.
Although a complete description, the complexity of the CODF, which is a function of the Euler angles describing possible crystallite orientation, renders its direct use awkward for many purposes. An alternate approach is to represent the CODF as a superposition of simple, known functions, much as a waveform might be represented as a sum of sine and cosine functions in a Fourier series. Formally, one writes
where ??, ?? are Euler angles describing the crystallite orientation with respect to the plate, 4=cos(O), zlmn are generalized Legendre function, and the wlmn are constants, known as orientation distribution coefficients (ODC's). Thus, the ODC's are analogous to the constants in a Fourier series. Given an experimental determination of the CODF, the ODC's can be determined using well-known mathematical manipulations. Alternatively, knowledge of the ODC's fully specifies the CODF. Hence, these two contain equivalent information that fully specifies the texture. The ODC's may be thought of as measures of the severity of the directional properties of the sheet. Figure 7 summarizes the procedure employed in determining the ODC's from X-ray pole figures.
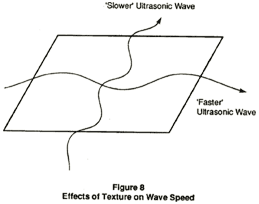
Measurement techniques use the angular variation of the ultrasonic waves in the sheet to detect texture and directionality. The effects of texture on velocity of an ultrasonic wave is to slow it down in one direction and make it faster in another (Figure 8). Ultrasonic velocity measurements take advantage of this effect, thus determining the formability and texture parameters such as the r's and W's.
