Penetrant Application and Dwell Time
 The penetrant material can be applied in a number of different ways, including spraying, brushing, or immersing the parts in a penetrant bath. The method of penetrant application has little effect on the inspection sensitivity but an electrostatic spraying method is reported to produce slightly better results than other methods. Once the part is covered in penetrant it must be allowed to dwell so the penetrant has time to enter any defect present.
There are basically two dwell mode options, immersion-dwell (keeping the part immersed in the penetrant during the 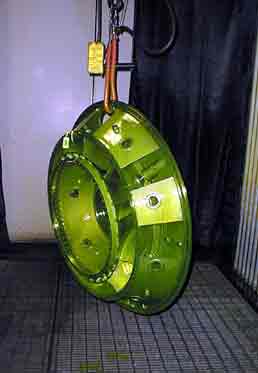 dwell period) and drain-dwell (letting the part drain during the dwell period). Prior to a study by Sherwin, the immersion-dwell mode was generally considered to be more sensitive but recognized to be less economical because more penetrant was washed away and emulsifiers were contaminated more rapidly. The reasoning for thinking this method was more sensitive was that the penetrant was more migratory and more likely to fill flaws when kept completely fluid and not allowed to lose volatile constituents by evaporation. However, Sherwin showed that if the specimens are allowed to drain-dwell, the sensitivity is higher because the evaporation increases the dyestuff concentration of the penetrant on the specimen. As pointed-out in the section on penetrant materials, sensitivity increases as the dyestuff concentration increases. Sherwin also cautions that the samples being inspected should be placed outside the penetrant tank wall so that vapors from the tank do not accumulate and dilute the dyestuff concentration of the penetrant on the specimen.
- Vaerman, J., Fluorescent Penetrant Inspection, Quantified Evolution of the Sensitivity Versus Process Deviations, Proceedings of the 4th European Conference on Nondestructive Testing, Pergamon Press, Maxwell House, Fairview Park, Elmsford, New York, Volume 4, September 1987, pp. 2814-2823.
- Sherwin, A.G., Establishing Liquid Penetrant Dwell Modes, Materials Evaluation, Vol. 32, No. 3, March 1974, pp. 63-67.
Penetrant Dwell Time
Penetrant dwell time is the total time that the penetrant is in contact with the part surface. The dwell time is important because it allows the penetrant the time necessary to seep or be drawn into a defect. Dwell times are usually recommended by the penetrant producers or required by the specification being followed. The time required to fill a flaw depends on a number of variables which include the following:
- The surface tension of the penetrant.
- The contact angle of the penetrant.
- The dynamic shear viscosity of the penetrant, which can vary with the diameter of the capillary. The viscosity of a penetrant in microcapillary flaws is higher than its viscosity in bulk, which slows the infiltration of the tight flaws.
- The atmospheric pressure at the flaw opening.
- The capillary pressure at the flaw opening.
- The pressure of the gas trapped in the flaw by the penetrant.
- The radius of the flaw or the distance between the flaw walls.
- The density or specific gravity of the penetrant.
- Microstructural properties of the penetrant.
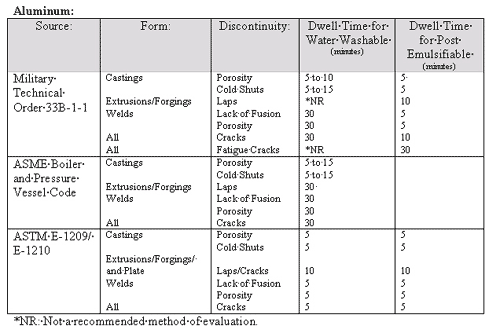
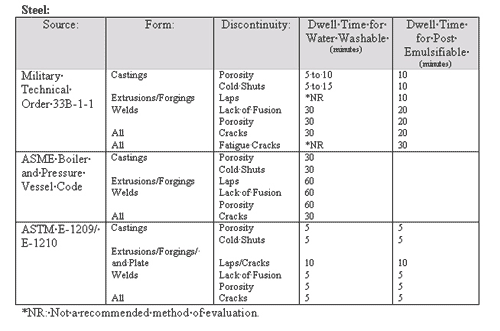
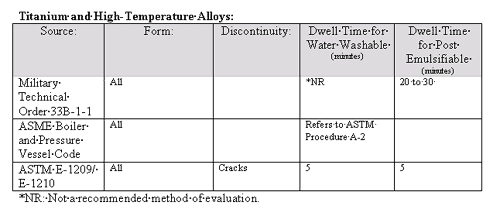
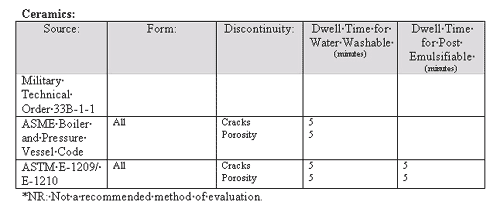
The ideal dwell time is often determined by experimentation and is often very specific to a particular application. For example, AMS 2647A requires that the dwell time for all aircraft and engine parts be at least 20 minutes, while ASTM E1209 only requires a five minute dwell time for parts made of titanium and other heat resistant alloys. Generally, there is no harm in using a longer penetrant dwell time as long as the penetrant is not allowed to dry.
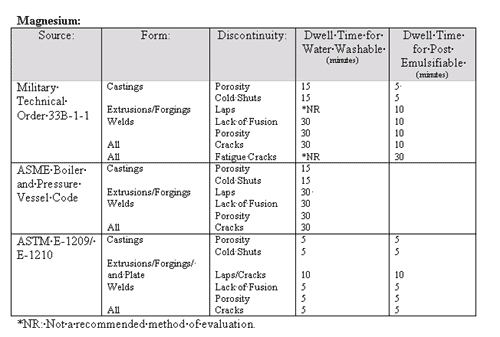
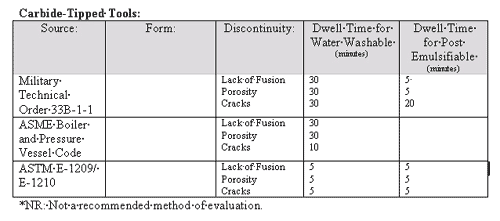
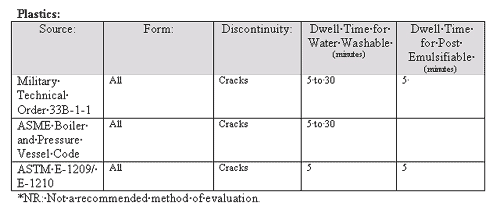
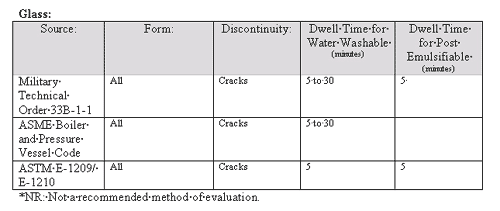
The following tables summarize the dwell time requirements of several commonly used specifications. The information provided below is intended for general reference and no guarantee is made about its correctness. Please consult the specifications for the actual dwell time requirements.
Some Research Results on Dwell Time
An interesting point that Deutsch makes about dwell time is that if the elliptical flaw has a length to width ratio of 100, it will take the penetrant nearly ten times longer to fill than it will a cylindrical flaw with the same volume.
- Deutsch, S. A, Preliminary Study of the Fluid Mechanics of Liquid Penetrant Testing, Journal of Research of the National Bureau of Standards, Vol. 84, No. 4, July-August 1979, pp. 287-291.
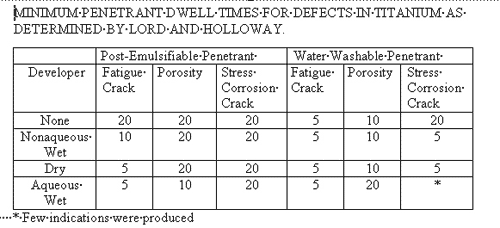
Lord and Holloway looked for the optimum penetrant dwell time required for detecting several types of defects in titanium. Both a level 2 post-emulsifiable fluorescent penetrant (Magnaflux ZL-2A penetrant and ZE-3 emulsifier) and a level 2 water washable penetrant (Tracer-Tech P-133A penetrant) were included in the study. The effect of the developer was a variable in the study and nonaqueous wet, aqueous wet, and dry developers were included. Specimens were also processed using no developer. The specimen defects included stress corrosion cracks, fatigue cracks and porosity. As expected, the researchers found that the optimal dwell time varied with the type of defect and developer used. The following table summarizes some of the findings.
- Lord, R. J. and Holloway, J. A., Choice of Penetrant Parameters for Inspecting Titanium, Materials Evaluation, October 1975, pp. 249-256.