Field Direction and Intensity
Field Direction
As discussed previously, determining the direction of the field is important when conducting a magnetic particle inspection because the defect must produce a significant disturbance in the magnetic field to produce an indication. It is difficult to detect discontinuities that intersect the magnetic field at an angle less than 45o. When the orientation of a defect is not well established, components should be magnetized in a minimum of two directions at approximately right angles to each other. Depending on the geometry of the component, this may require longitudinal magnetization in two or more directions, multiple longitudinal and circular magnetization or circular magnetization in multiple directions. Determining strength and direction of the fields is especially critical when inspecting with a multidirectional machine. If the fields are not balanced, a vector field will be produced that may not detect some defects.
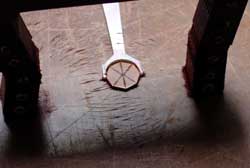
Depending on the application, pie gages, QQI's, or a gauss meter can be used to check the field direction. The pie gage is generally only used with dry powder inspections. QQI shims can be used in a variety of applications but are the only method recommended for use in establishing balanced fields when using multidirectional equipment.
Field Strength
The applied magnetic field must have sufficient strength to produce a satisfactory indication, but not so strong that it produces nonrelevant indications or limits particle mobility. If the magnetizing current is excessively high when performing a wet fluorescent particle inspection, particles can be attracted to the surface of the part and not be allowed to migrate to the flux leakage fields of defects. When performing a dry particle inspection, an excessive longitudinal magnetic field will cause furring. Furring is when magnetic particles build up at the magnetic poles of a part. When the field strength is excessive, the magnetic field is forced out of the part before reaching the end of the component and the poles along its length attract particles and cause high background levels. Adequate field strength may be determined by:
- performing an inspection on a standard specimen that is similar to the test component and has known or artificial defects of the same type, size, and location as those expected in the test component. QQI shims can sometimes be used as the artificial defects.
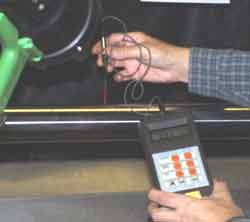
- using a gauss meter with a Hall effect probe to measure the peak values of the tangent field at the surface of the part in the region of interest. Most specifications call for a field strength of 30 to 60 gauss at the surface when the magnetizing force is applied.
- looking for light furring at the ends of pipes or bars when performing dry particle inspections on these and other uncomplicated shapes.
Formulas for calculating current levels should only be used to estimate current requirements. The magnetic field strength resulting from calculations should be assessed for adequacy using one of the two method discussed above. Likewise, published current level information should also be used only as a guide unless the values have been established for the specific component and target defects of the inspection at hand.
Using a Pie Gage
 A pie gage is placed copper side up and held in contact with the component as the magnetic field and particles are applied. Indications of the leakage fields provide a visual representation of defect direction within the component. Pie gages work well on flat surfaces, but if the surface is concave or convex, inaccurate readings may occur. The pie gage is a flux sharing device and requires good contact to provide accurate readings.
Using Quantitative Quality Indicator (QQI) Shims
Quantitative Quality Indicator (QQI) flaw shims are used to establish proper field direction and to ensure adequate field strength during technique development. The QQI flaw shim is the most efficient means of determining balance and effectiveness of fields. The QQI's are also flux sharing devices and must be properly attach so as not to allow particles to become trapped under the artificial flaw. Application using Super glue is the preferred way of attaching the artificial flaw, but does not allow for reuse of the shims. Shims can also be attached with tape applied to just the edge of the shim. It is recommended that the tape be impervious to oil, not be fluorescent, and be 1/4 to 1/2 inch in width.
The QQI must be applied to locations on the component where the flux density may vary. One example would be the center area of a yoke or Y shaped component. Oftentimes, the flux density will be near zero in this area. If two legs of a Y are in contact with the pad in circular magnetization, it must be determined if current is flowing evenly through each leg. A QQI on each leg would be appropriate under such conditions.
QQI's can be used to establish system threshold values for a defect of a given size. By attaching a QQI shim with three circles (40%, 30% and 20% of shim thickness) to the component, threshold values for a specific area of the component, can be established. Begin by applying current at a low amperage and slowly increasing it until the largest flaw is obtained. The flux density should be verified and recorded using a Hall effects probe. The current is then increased until the second circle is identified and the flux density is again recorded. As the current is further increased, the third ring is identified and the current values are recorded.
Hall Effects Gauss Meter
 There are several types of Hall effects probes that can be used to measure the magnetic field strength. Transverse probes are the type most commonly used to evaluate the field strength in magnetic particle testing. Transverse probes have the Hall effect element mounted in a thin, flat stem and they are used to make measurements between two magnetic poles. Axial probes have the sensing element mounted such that the magnetic flux in the direction of the long axis of the probe is measured.
To make a measurement with a transverse probe, the probe is positioned such that the flat surface of the Hall effect element is transverse to the magnetic lines of flux. The Hall effect voltage is a function of the angle at which the magnetic lines of flux pass through the sensing element. The greatest Hall effect voltage occurs when the lines of flux pass perpendicularly through the sensing element. If not perpendicular, the output voltage is related to the cosine of the difference between 90 degrees and the actual angle. The peak field strength should be measured when the magnetizing force is applied. The field strength should be measured in all areas of the component to be inspected.